reNode for Houdini (Tool & case Study)
When it comes to working with node based editors, some people (me at least) takes it to a whole new level of madness and mental disorders. Where a fair amount of time always spent in trying hard to make the connection lines straight, or trying as much as possible to make the graph looks artistic even if it takes to add some useless nodes for decorations 😀 I won’t mind adding a 100 reroute node within Unreal Engine just to make the simplest graph looks very tidy.
And came from that background, I decided to try out something new with my graphs, which is adding custom node shapes into Unreal & Houdini. Let’s mention the Houdini case here, as it’s clearly the target of this group.
Please welcome my reNode v1.0
https://drive.google.com/file/d/1fUPlV-gr2DYSgdpl_dslkBCjHTaLCGJ2/view?usp=sharingNew link because google hate the exe files: https://mamoniem.com/wp-content/uploads/reNode/reNode.rar
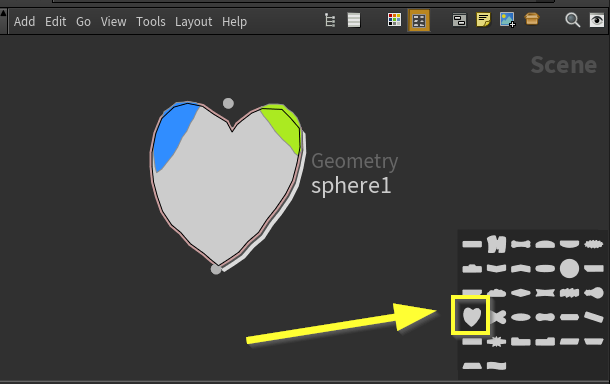
reNode is a C# based tool (standalone application). That allow you to create your own custom node shapes and then use them right away in Houdini.
The process is as follow:
- Draw the node shape
- Save it’s file
- Copy it from the C drive to the shapes root of Houdini, Restart Houdini
- You can use it!
Watch that quick video:
When I got the idea of having my own custom node shapes, I started looking around Houdini directories itself, at the end of the day lots of apps, SDKs and tools keep tons of things not packed or encrypted. This worked a lot with me in the past, you can check out the Uinty3d case if you didn’t already. Back to Houdini, it didn’t take much time to find the node shapes library folder:
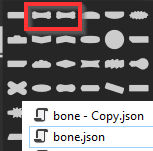
E:\Program Files\Side Effects Software\Houdini 16.5.268\houdini\config\NodeShapes
As a very friendly file format for me, the JSON seemed very different this time. I was not able to understand it quickly, so I decided to check first if it is even possible to add new shape by duplicating the files, or it needs me to change some values or an array somewhere. So, I’ve duplicated one file, renamed it, and changed the only obvious (at the time) value for me, which was the “name” of the shape, so I avoid and failure cases of Houdini loading the shape by name and then overriding it with the new one by name as well. And then restarted Houdini (it make sense that the app will read that only at launch). And BOOM, I found the same shape twice!
Now I was sure, whatever I’m going to do, I can use it right away. So I moved to the next part of the issue, which is the JSON file content itself. I tried to read it first and failed to make any sense of it, then I tried to google for “Convert a shape to JSON” I came to lots of dead ends of online converters that will give a totally different file content, while this was a failure, but I came up with a great assumption, that the content of the file is only subjective to Houdini, and not global type of content that I can find within other apps or JSON files. So I decided to go in the most primitive way, which is just randomly changing some values in the new shape file I’ve duplicated, and notice what would be changed in the nodes. So I took them line by line, and changing some random value, and I ended up with deformations in shapes that can tell me what I really needed to know.

It is now became very clear to me, that we have 4 toggle options per node, which are represented in the JSON file with the name “Flags”, and we have the body of the node, which represented with the word “Outline”, and the rest were very self-explanatory, which are “Inputs” for the input socket, “Output” for the output socket & “Icon” for the icon of that node.
All nodes have Inputs and outputs, and icons. Which made their naming make sense. All nodes have bodies, which was named “Outline” and I kind of considered it confusing. But The name “Flags” was really a smart idea from SideFX as not all node are equal. As you see at the image above I’ve deformed the Bypass toggle of the node which is colored in Yellow (that node have 4 flags), which in another node it is not called Bypass any more, it is a Selectable toggle and colored in Green (and the node have only 2 flags).

Now I got it, the Flags are numbered 0, 1, 2, 3 is not only representing an array order, but also the order of the nodes from Screen Left to the Screen Right. As the one changed above was Flag number 0. And that mean in a 4 toggles node, Houdini will show [0, 1, 2, 3], but in a 2 toggles node Houdini will show [0, 3]. As 0 and 1 is the left side screen toggles, and 2 and 3 are the right side screen toggles.
With that said, Changing the toggle 1 will affect the 4 toggles node:

Where the 2 toggles node will remain the same, as it doesn’t have the index toggle 1

But changing the Index 3 (the last index, which is the far right of the screen), will affect both types of nodes. In a 4 toggles node:

Where in a 2 toggles Node:
Now I’ve a very clear Idea about how Houdini handle the shape of a node. What is needed to make use see a node drawn on the canvas. With all that in mind, I decided to make sure I’m at the right direction though, so I wrote a very small interface, that can take a string value I copy from that JSON shape file, and it break it down to points in space, so I can see if those numbers I’ve been changing randomly is really representing a drawing, so far I’ve been changing numbers randomly, which gave me those weird shapes you seeing above. And Holy Moly, I was right, parsing those copied JSON nodes will draw some shapes to me. Some were based on Vec2 values where others are based on vec3 values (Vec3 is mostly used to do layering, imagine drawing something on top of something else, you give some offset to make it closer to the camera). So if we break down the order of drawing for a Houdini node, we will end up with (far to near):
- Toggles/Flags
- Body outline
- Input socket
- Output socket
- Icon
And while my interface was able to read the JSON shape file, I knew that it is a matter of time and implementation for a nice drawing functionality, and I’ll be able to write down my own JSON shape files quickly, and use them within Houdini. After few days I finished writing my tool, and it was too much fun to do. It took me sometime to keep iterating in the UX of the tool, to make sure it visually looks like my other tools, and it works at the most reliable way, that a user can understand quickly or at least can be familiar with after a quick demonstration. And the results was really nice and I’m glad to move during those weeks from v0.1 to v1.0 it was a good learning experiment =D
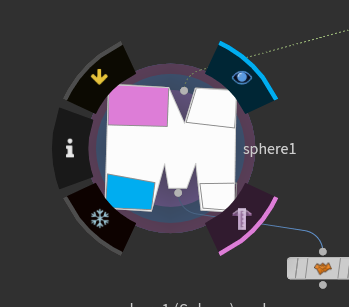
It might mean nothing changing the node shapes, I might not able to draw amazing shapes, and for a long time I’ve been using the default node shapes, not even changing their colors. But the idea here was a matter of demystifying; the more you get into the heart of the tech you use, the more you learn about it. It was about learning more in depth about the SDK I use. And most importantly feeding my disorders of a visually unique graphs! Now I can have my special “M” node 🙂
Last thing I want to mention is the guidelines:
- The tool still will get some development
- You can’t move a point as soon as it is placed (to be changed)
- The order or the points matter, it has to make sense of a curve to get drawn
- For the icon, you have to use only 2 points, Houdini want a diagonal line which represent the the icon top corner with the reversed corner
- Don’t forget to add a name to the shape
- Input and Output, are enough to be a straight line to define where sockets could be distributed
Enjoy your nodes!
-m


